Keyframes Alight Motion | Mastering Guide in (2024)
Alight Motion is an amazing animation and video editing app to convert your brainstorm into a captivating visual symphony. Keyframes Alight Motion are an influential factor in putting handsome life into your video. That’s why most people ask how to add keyframes in Alight Motion or what keyframes are.
From this article, you will get all about the implementation of keyframes. You will learn to add keyframes effectively and edit them efficiently. You will also be able to troubleshoot in case of any problems. It will reduce your effort and make your work as simple as ABC.
It will help you to create popular videos within a short period. I will give some tips about keyframes that will help to increase your expertise. So keep reading our guide carefully.
What are Keyframes Alight Motion
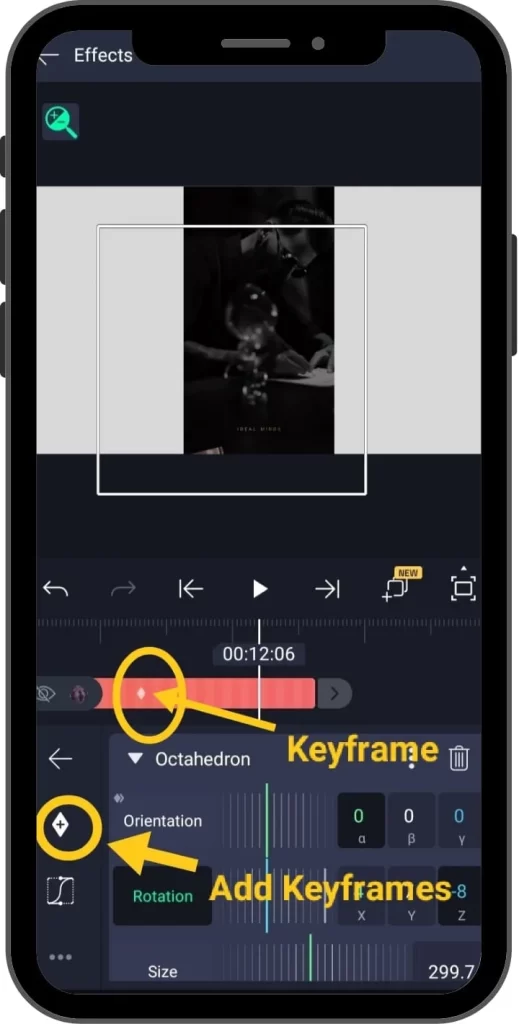
Keyframes are the specific points on the video timeline between which you want to bring particular changes in objects or animation. You can control the animation’s speed, scale, movement, direction, and location. Keyframes are fantastic tools that help you spice up your videos like a master chef.
It makes your video eye-catching and helpful in keeping your audience sticky with tape. If you want to give your video a natural look, use keyframes in your animation. For example, if you’re going to add a moving or rotating text layer in a video, then you can do it by adding keyframes.
Import Note
Keyframes will work when you add two or more than two keyframes on a video timeline. A single keyframe will not give you desired results.
Types of Keyframes
Alight Motion supports two kinds of keyframes.
Linear Keyframes: It supports a flat shift between two keyframes like waves.
Hold Keyframes: It keeps the animation possessions constant until the next keyframe and gives sudden changes.
How to Use keyframes in Alight motion (iPhone/Android/PC)
If you want to add keyframes in your video to make it heat touching, then follow these steps. You can apply this method in all cases, i.e. Android, iPhone, PC.
Tips for Using Keyframes Effectively
There are some special tips to make your video efficient by using keyframes effectively.
Graph Editor
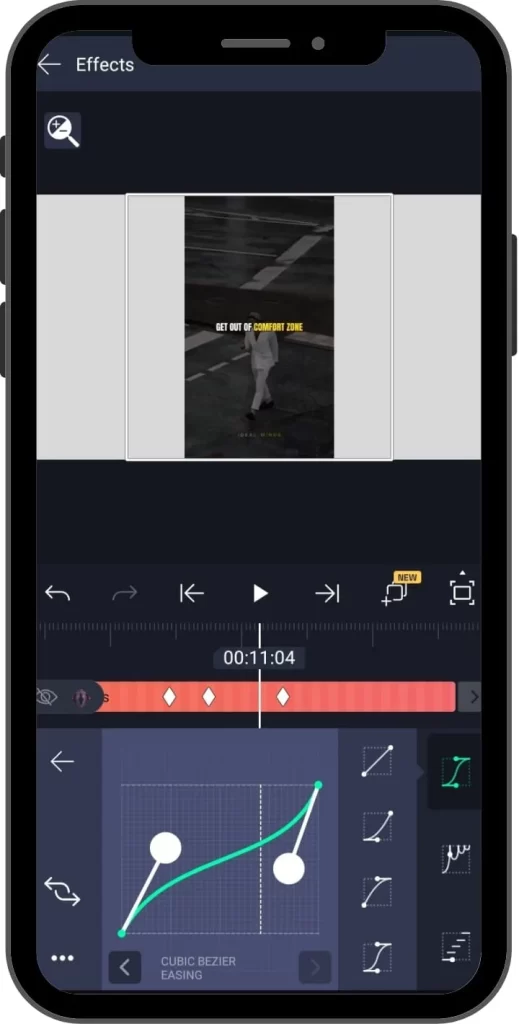
It controls the speed of objects on the video timeline.Using a graph editor will make your video the apple of everyone’s eye. You can create a shake effect to thrill your fans by adjusting the curves on the graph.
Timing of Keyframes
Keyframes timing plays a vital role in effectively using keyframes. So keep in mind the duration of keyframes. It should meet your requirements.
Use Innovative Properties
The newbies only use traditional properties like size, position, filter, etc. There are also other properties like velocity blur, colours, speed effects, rotation, etc. So it would help if you also used these new effects, which increase the worth of the video.
Use Presets
Thousands of simple and complicated templates and themes are present for ease. Use these presents in your video and add keyframes to explore the new horizons of your ideas. It will save your energy and give an engaging video for the audience.
Use Multiple Keyframes
Use multiple keyframes in a single video to enhance its professionalism. But keep in mind that don’t make it complicated. Every keyframe should add value to your content.
Natural Look
Use effects and tools until the video gives a natural look. Don’t give it a robotic look by overuse of effects and properties.
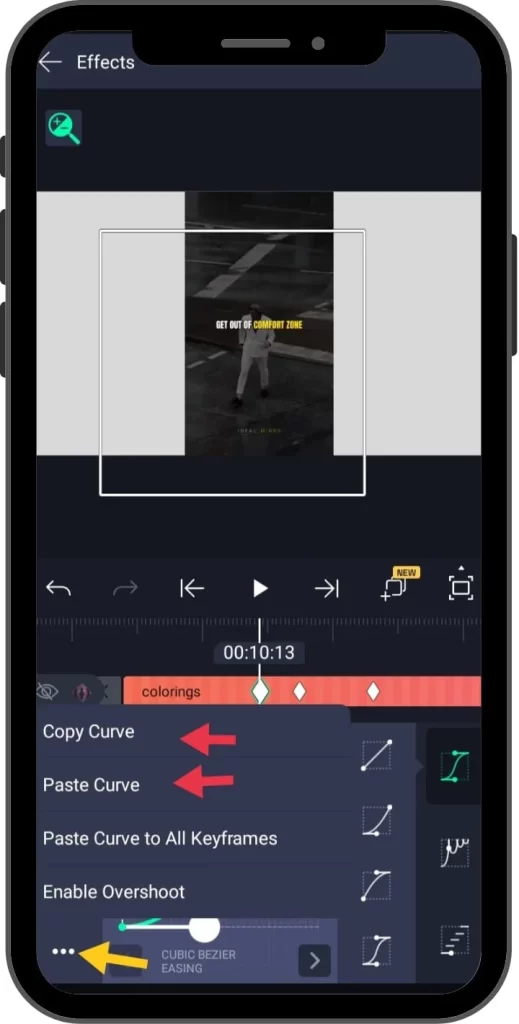
How to Copy Keyframes in Alight Motion
Alight Motion Mod APK facilitates you to copy and paste the keyframes in the video. So if you want to use your pre-designed keyframes in Alight Motion at different places, copy and paste them and save energy. Following things to keep in mind while copying.
How to Add and Remove Keyframes in Alight Motion ( iPad/Android/iOS/PC )
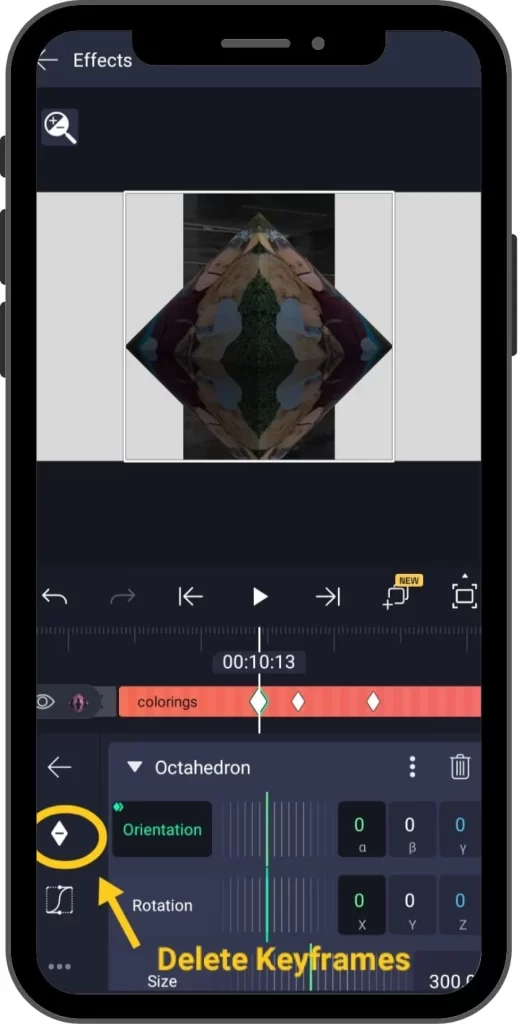
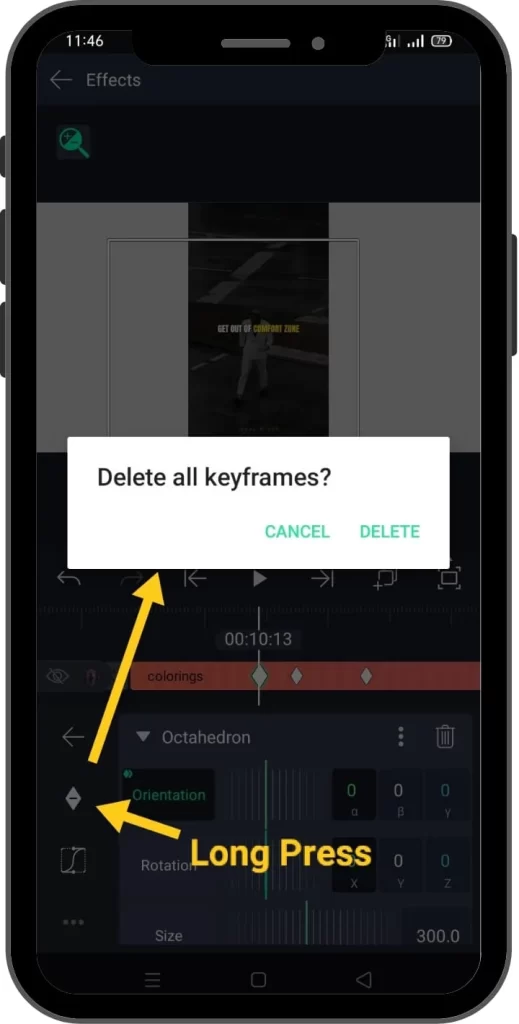
Most people don’t know how to remove keyframes from the timeline. Alight Motion facilitates you in just one click. You can add keyframes by tapping the ‘ + ‘ icon in a diamond shape. You can delete a keyframe by two methods.
- , this + icon changed into ‘ – ‘ when adding keyframes on the timeline
- Simply click this negative icon and the keyframe will be deleted.
- Select the keyframe which you want to remove and press the delete button.
- To delete all keyframes, use the keyboard shortcut control+A and press the delete button.
Why Use Keyframes Alight Motion ( iOS/Android )
Keyframes help to plot points on the imagination map in a fantastic video creation process. Most people are afraid to use keyframes because they consider their use difficult. But Alight Motion provides a user-friendly interface for using keyframes.
The keyframes feature of Alight Motion is flexible as a gymnast. You can add and remove keyframes with just one click. The facility of the graph editor in Alight Motion keyframes is like a magician’s trick. You can control the speed of objects and give specific locations to your animates. You can also change colours, movement, and everything in keyframes.
Summary
Alight Motion is one of the best ways to align your video clips seamlessly. The keyframes option in Alight Motion helps you to make your video like a Hollywood blockbuster. The use of keyframes Alight Motion is much simpler and as smooth as silk. So if you want to add value to your video, you must use keyframes effectively. There is same process for iOS, Android, or Window.


One Comment